Somewhat on impulse I ordered a Raspberry Pi Zero “W”. Not sure how I hadn’t heard about this until now (Zero first came out in 2015, “Zero W” with Wifi/Bluetooth in 2017), but as soon as I saw it I had to have one:
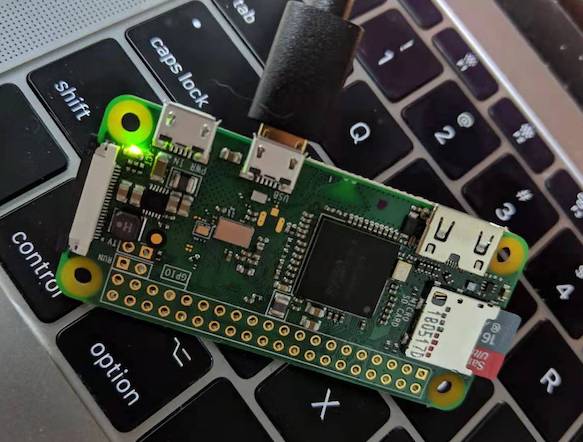
Dawww… look at that lil’ guy.
Way back in early 2000’s I did a project with wireless “Motes” running TinyOS:
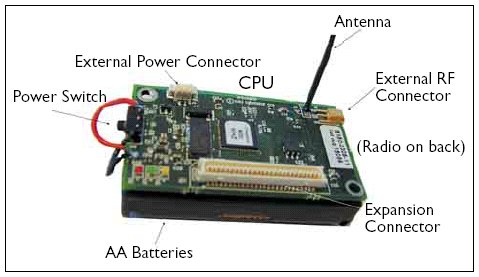
I can’t remember which exact model we had but they all seem to have around 4 KB of SRAM and 512 KB flash memory. Here we are nigh 20 years later and the Zero is an absolute beefcake with 512 MB RAM, micro SD slot (here 16 GB), and paired with a single-core 32-bit ARM CPU.
Equipment:
- Raspberry Pi Zero- preferably a “W” or “WH”
- Micro SD card (at least 8GB)
- Micro SD card reader, or SD card reader with adapter
- “Regular” USB-A (male) to micro-B (male) cable
- Come with many things (e.g. all but the latest devices using USB-C)
- Some charging cables don’t have data wires and won’t work
Optional, but occasionally useful:
- Power adapter with USB micro-B connector or another USB-A to micro-B cable like above
- You can power the Zero via a cable from your PC to the micro USB port labeled “USB” on the Zero, but it’s convenient to have separate power so you can unplug the first
- mini HDMI to standard/type-A HDMI adapter or cable (to connect Zero to external display)
- USB-A (female) to micro-B (male) OTG adapter (to connect/keyboard mouse to Zero)
Setup
Doing a basic install of Rasbian is similar to with the Pi 3:
Prior to the Zero W/WH with wifi, there was an approach to configure the system completely headless and get it on the network that’s still pretty useful:
- Download Raspbian
- Install- write the image to the SD card:
diskutil list # My sdcard is /dev/disk2 # Write raspbian image to SD in /dev/disk2 diskutil unmountDisk /dev/disk2 # Note: /dev/rdiskX sudo dd bs=1m if=~/Downloads/2019-09-26-raspbian-buster.img of=/dev/rdisk2 conv=sync # Enable SSH touch /Volumes/boot/ssh # Configure as USB gadget echo "dtoverlay=dwc2" >> /Volumes/boot/config.txt vim /Volumes/boot/cmdline.txt # After `rootwait` add: modules-load=dwc2,g_ether # Note: /dev/rdiskX sudo diskutil eject /dev/rdisk2 - Insert the SD card into the Pi Zero
- Connect your PC to the Zero’s micro USB port labeled “USB” (it’s the one closest to HDMI) to power it on.
- Make sure to use a cable with data wires- some charging cables don’t have them. If a device isn’t found, try another cable.
-
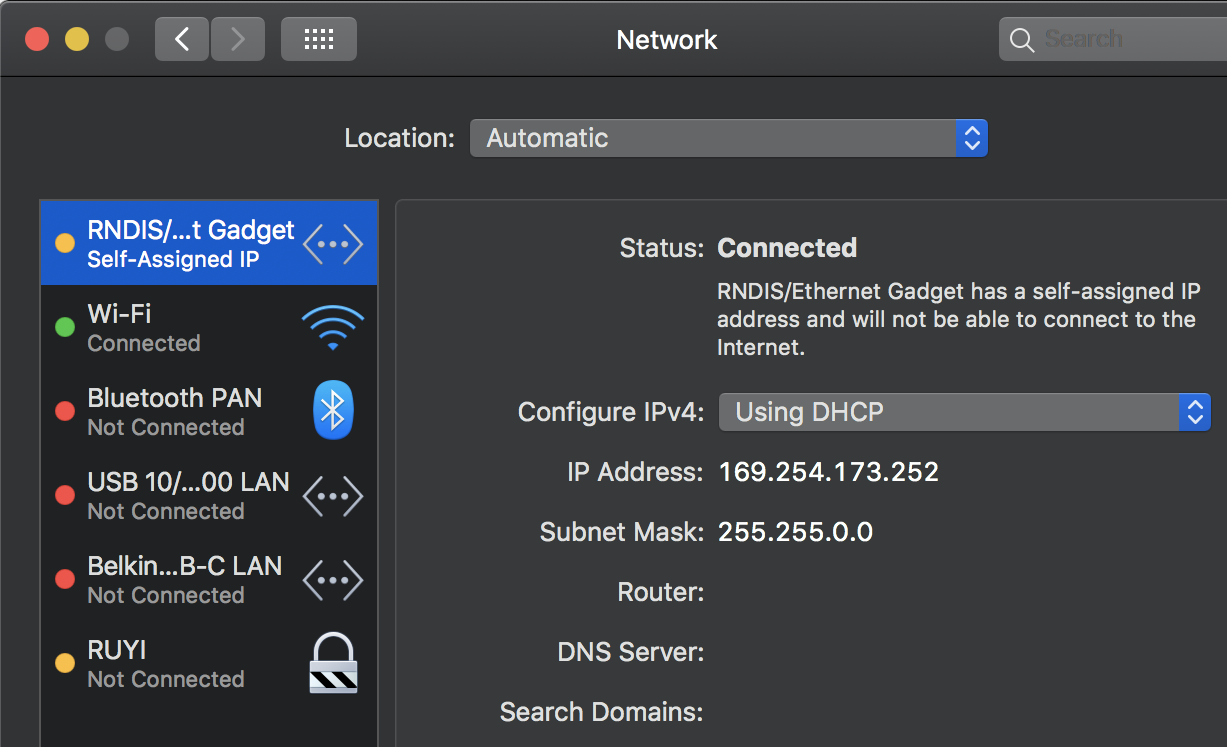
Wait ~30 seconds, in System Preferences > Network you should see:
- Connect to the Zero:
# Setup ssh key authentication. Default password is `raspberry` ssh-copy-id pi@raspberrypi.local ssh -X pi@raspberrypi.local -
Enable internet sharing to get the Zero online:
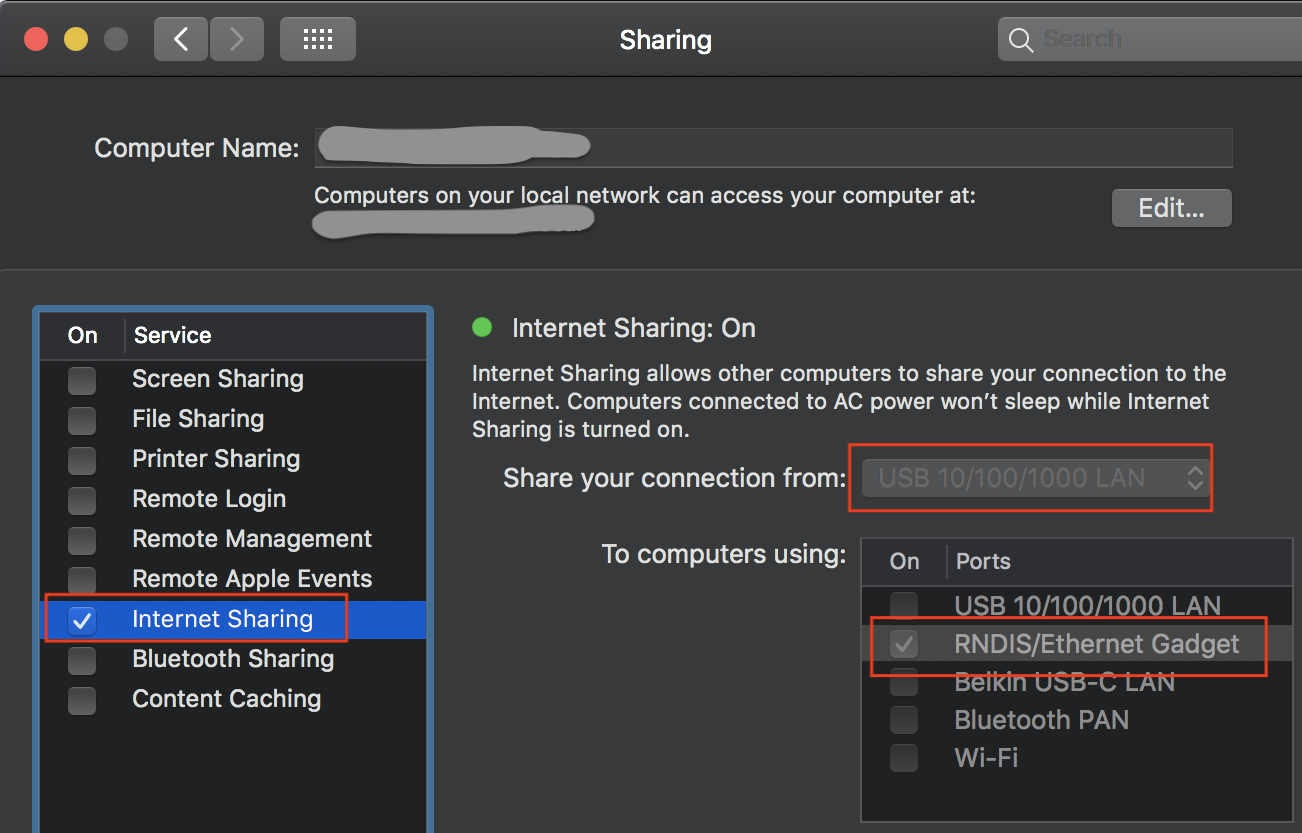
- Open System Preferences > Sharing
- Share your connection from- select your computer’s internet connection (probably either LAN or Wifi)
- To computers using select the
RNDIS/Ethernet Gadget - Select “Internet Sharing” On checkbox
- Note that if the wifi uses 802.1x authentication (like our office) connection sharing won’t work.
- Continue setting up networking and installing software.
Software
One important difference is the Zero is armv6 (with VFPv2 but no NEON- like the Raspberry Pi 1) instead of armv7 like the Raspberry Pi 3. This means the available .NET Core, PowerShell, VS Code and other binaries won’t “just” work. We may look into building 32-bit .NET Core from source, but with a single core puttering along at 1 GHz and only 512 MB of RAM I doubt VS Code would run well.
Remember when we advocated learning vim or emacs? Guess what works beautifully on low-end devices like the Zero.
Thankfully, Rust also works! All we really need is Rust anyway.
Cross Compiling
It’s easy to install Rust on the Zero via rustup:
curl https://sh.rustup.rs -sSf | sh
Let’s build runng.
On a 2017 MacBook Pro cargo clean; cargo build takes about 20 seconds.
On the Pi Zero, it takes 66 minutes. Ouch!
This looks like a job for cross compiling! This is perhaps the most complete document on cross-compiling with Rust, but it is a bit dated. We’ll look at using musl to create stand-alone binaries. Afterall, who wants to deal with shared libraries?
The best approach depends on your situation:
- Which machines/devices/OSes are available
- Complexity/requirements of the build environment
- Familiarity with docker/cargo (especially when it comes to cacheing crates)
Here’s a summary of the options I’ll cover:
| Approach | Time (minutes:seconds) | Notes |
|---|---|---|
| Baseline x86_64 | 0:20 | MBP; dual-core 2.5 GHz Intel Core i7 with 16 GB 2133 MHz LPDDR3 |
| musl-cross | 0:20 | MBP; dual-core 2.5 GHz Intel Core i7 with 16 GB 2133 MHz LPDDR3 |
| rust-musl-cross | 0:26 | Hyper-V on i5-7500 @ 3.4 GHz; VM with 2 VCPU and 4 GB RAM running Ubuntu 18.04 |
| Pi 3 B | 2:15 | |
| Qemu | 5:15 | Hyper-V on i5-7500 @ 3.4 GHz; VM with 2 VCPU and 4 GB RAM running Ubuntu 18.04 |
| Zero | 66:00 |
These aren’t meant to be directly comparible since I didn’t have identical hardware to run everything on. But, it should give you some idea of the convenience/flexibility vs. build time trade-offs you can make.
MacOS
musl-cross
On Macs, we can use the same approach we use to target AWS Lambda or our Pi 3 pm2.5 monitor. Let’s start with something simple, a “hello world” binary. On a Mac (not on the Zero):
cargo new --bin hello_muscles
cd hello_muscles/
In hello_muscles/.cargo/config (or ~/.cargo/config) add:
[target.arm-unknown-linux-musleabihf]
linker = "arm-linux-musleabihf-gcc"
# Install arm/x86_64 linux-musl cross-compilers
brew install FiloSottile/musl-cross/musl-cross --with-arm-hf
# Install rust target
rustup target add arm-unknown-linux-musleabihf
# Build
CROSS_COMPILE=arm-linux-musleabihf- cargo build --release --target arm-unknown-linux-musleabihf
Check target/arm-unknown-linux-musleabihf/release/ for output:
$ file target/arm-unknown-linux-musleabihf/release/hello_muscles

target/arm-unknown-linux-musleabihf/release/hello_muscles: ELF 32-bit LSB executable, ARM, EABI5 version 1 (SYSV), statically linked, with debug_info, not stripped

$ ls -l target/arm-unknown-linux-musleabihf/release/hello_muscles

-rwxr-xr-x  2 jake  staff  2674552 Mar 18 16:28 target/arm-unknown-linux-musleabihf/release/hello_muscles
A ~2.7MB self-contained ARM32 executable. Not bad, but we can do even better by stripping the executable:
$ arm-linux-musleabihf-strip target/arm-unknown-linux-musleabihf/release/hello_muscles

$ ls -l target/arm-unknown-linux-musleabihf/release/hello_muscles

-rwxr-xr-x  2 jake  staff  201760 Mar 28 14:51 target/arm-unknown-linux-musleabihf/release/hello_muscles
A sliver over 200 KB! Let’s give it a whirl on the Zero:
# No passwords needed, thanks key-auth!
scp target/arm-unknown-linux-musleabihf/release/hello_muscles pi@raspberrypi.local:~/
ssh pi@raspberrypi.local

pi$ ./hello_muscles
Hello, world!
crosstool-NG
A lot of older posts mention crosstool-NG, but MacOS is no longer officially supported. We didn’t look into it further, but it might be useful for Windows/Linux environments.
Linux
There’s numerous different approaches on Linux and we’re not going to cover all of them. Feel free to leave a comment if you have a favorite not mentioned here. Regardless, there’s a few other commadns that come in handy:
# Get general information about executable
file <path_to_binary>
# More detailed information than `file`, such as whether soft or hard-float, etc.
readelf -A <path to binary>
rust-musl-cross
If you’re comfortable with docker and building your project can be nicely containerized, rust-musl-cross might be a good option:
alias rust-musl-builder='docker run --rm -it -v "$(pwd)":/home/rust/src messense/rust-musl-cross:arm-musleabihf'
rust-musl-builder cargo build --release
There’s tags for other exotic architectures like armv7-musleabihf, etc.
There’s also rust-musl-builder: primary targetted at x86_64 although it has some limited form of support for armv7 (i.e. Raspberry Pi 2 and 3, but not Zero).
Cross
The Rust embedded team has a tool cross that might make everything easier:
# Try this first.  It's working if `cross build` pulls docker images.
cargo install cross
cross build --target arm-unknown-linux-musleabi

# At the time of this writing, most recent release is from Nov. 2017 and didn't work for me
$ cross -V
cross 0.1.14

# Use HEAD
cd
git clone https://github.com/rust-embedded/cross.git
cd cross
cargo build --release
cd ../some_project_source
~/cross/target/release/cross build --target arm-unknown-linux-musleabihf
Make sure you have completed the Post-installation steps for Linux because it assumes you don’t need sudo docker.
Even if you can get cross working, the default images may not work for whatever you’re trying to build. In fact, not all target triples supported by Rust have docker images:
$ cross build --target arm-unknown-linux-musleabihf

Unable to find image 'japaric/arm-unknown-linux-musleabihf:latest' locally
docker: Error response from daemon: pull access denied for japaric/arm-unknown-linux-musleabihf, repository does not exist or may require 'docker login'.
To work around this, cross enables you to specify custom docker images.
Docker and Qemu
We’re using Docker and Qemu to simplify building and testing for multiple platforms.
If none of the above solutions work for you, it’s pretty easy to work with docker and qemu:
# Do this once after starting docker
docker run --rm --privileged multiarch/qemu-user-static:register --reset
# Create interactive console and mount PWD as /usr/src
docker run -it --rm -v $(pwd):/usr/src multiarch/debian-debootstrap:armhf-stretch

docker$ apt-get install -y # Pre-requisites...
# Note that Debian "armhf" is armv7
docker$ cargo build --target arm-unknown-linux-musleabi
# When you're done leave the interactive shell
docker$ exit

# Check target/arm-unknown-linux-muslXXX/YYY/ for binaries
Performance will vary depending on docker/qemu/host resources, but it should be slower than cross-compiling and much faster than the Zero.
Pi 3
A final option is to do the build on another ARM device like a Raspberry Pi 3 where you won’t have to cross-compile. The probably only makes sense if you’ve got a low-end laptop or are using the Pi as your dev PC.
The End?
Hardly. We’ve got Linux installed and running on the Zero, and we’ve got a dev environment so we can start building something. Now for the next step.