That day has come.
There’s been a Raspberry Pi 3 B with a touchscreen running Windows 10 IoT Core on my desk at work for a while now.
We’ve been using docker and Qemu to test aarch64/ARM64, but .NET Core for ARM32 doesn’t work atop Qemu. So we need an actual device running Debian. It just so happens I have another Pi 3!
Install Raspbian
The official installation instructions are good:
- Download Raspbian
- Install
- Insert the SD card into the RPi and power it on
For example, on macOS:
diskutil list
# My SD card is /dev/disk2

diskutil unmountDisk /dev/disk2
# Note: /dev/rdiskX not /dev/diskX
sudo dd bs=1m if=~/Downloads/2019-09-26-raspbian-buster.img of=/dev/rdisk2 conv=sync

# OPTIONAL: headless configuration (see below)

# Note: /dev/rdiskX
sudo diskutil eject /dev/rdisk2
Initial Shell Access
Once the system starts, you can login using default username pi and password raspberry.
Perhaps the expected way to initially login is to connect a display to HDMI and keyboard to USB. Should that not be an option, you can also do it “headless”. These can be done when preparing the Raspbian image; after you dd the image but before you diskutil eject and remove it from the PC.
Headless Option: SSH
- Create empty
/boot/sshfile on SD card (docs):# On Mac touch /Volumes/boot/ssh - Ensure both the pi and your PC are connected to the same subnet
- Ethernet: just need DHCP
- Wifi:
- Create
/boot/wpa_supplicant.confon SD card - You may also need to disable “AP isolation”
- Create
- Eject SD card and insert back in pi. Power on pi.
- From PC, ssh in using default username/hostname:
ssh pi@raspberrypi.local(or IP address)
It’s also possible to do this with a static IP instead of DHCP, but you’ll need a separate tutorial for that.
Headless Option: Console
It’s also possible to use a USB-to-TTL serial/console cable, like the one available from adafruit. Following their nice tutorial:
- PC support
- Linux: built-in with kernel 2.4.31 and up
- OSX: install driver
- In
/boot/config.txtof SD card, addenable_uart=1 - Connect as shown
- Note red wire (power) is not connected
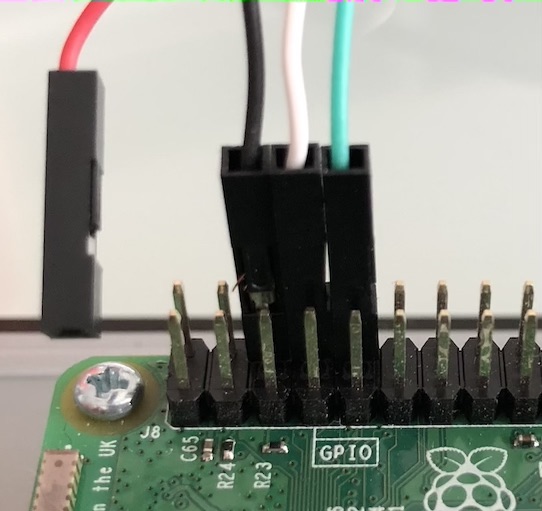
- Note red wire (power) is not connected
- Connect USB end to PC
- Identify serial device
- MacOS: run
ls /dev/cu.*and look forcu.SLAB_USBtoUARTorcu.usb* - Linux: run
dmesgand look for e.g./dev/ttyUSB0
- MacOS: run
- Connect using
screen# On Mac screen /dev/cu.SLAB_USBtoUART 115200- If the terminal is blank hit
return - For
screenbasics, see below
- If the terminal is blank hit
Networking
Pretty much the first thing I ever do is get SSH working. While enabling that you can do a few other things:
sudo raspi-config
- Enable SSH: Interfacing Options > SSH > Yes
- Enable VNC: Interfacing Options > VNC > Yes
- Setup wifi: Network Options > Wi-fi
- This requires you manually input the SSID. If you can wait for wifi and want the GUI treatment you can use e.g. VNC
- Change hostname: Network Options > Hostname
- If you change this, remember to use it instead of the default,
raspberrypi
- If you change this, remember to use it instead of the default,
Alternatively, from the desktop, 🍇 > Preferences > Raspberry Pi Configuration > Interfaces (ok, that’s not a raspberry, it’s grapes… but it looks pretty close).
When it comes to Linux configuration, one of the best investments you can make is setting up “SSH Key-Based Authentication”. If that means nothing to you, look into it, it will change your life. There’s numerous excellent guides on the internet, but if you’re on Linux/macOS you should be able to:
# On PC: default password is "raspberry"
ssh-copy-id pi@raspberrypi.local
# From now on you can ssh in without a password
# -X enables X11 forwarding
ssh -X pi@raspberrypi.local
If you’ve got multiple devices, or you re-flash at some point you’ll see the very scary:
@@@@@@@@@@@@@@@@@@@@@@@@@@@@@@@@@@@@@@@@@@@@@@@@@@@@@@@@@@@
@       WARNING: POSSIBLE DNS SPOOFING DETECTED!          @
@@@@@@@@@@@@@@@@@@@@@@@@@@@@@@@@@@@@@@@@@@@@@@@@@@@@@@@@@@@
The ECDSA host key for raspberrypi.local has changed,
and the key for the corresponding IP address 169.254.28.197
is unknown. This could either mean that
DNS SPOOFING is happening or the IP address for the host
and its host key have changed at the same time.
@@@@@@@@@@@@@@@@@@@@@@@@@@@@@@@@@@@@@@@@@@@@@@@@@@@@@@@@@@@
@    WARNING: REMOTE HOST IDENTIFICATION HAS CHANGED!     @
@@@@@@@@@@@@@@@@@@@@@@@@@@@@@@@@@@@@@@@@@@@@@@@@@@@@@@@@@@@
IT IS POSSIBLE THAT SOMEONE IS DOING SOMETHING NASTY!
Someone could be eavesdropping on you right now (man-in-the-middle attack)!
It is also possible that a host key has just been changed.
The fingerprint for the ECDSA key sent by the remote host is
SHA256:XXXXXXXXXXXXXXXXXXXXXXXXXXXXXXXXXXXXXXXXXXX.
Please contact your system administrator.
Add correct host key in /Users/XXX/.ssh/known_hosts to get rid of this message.
Offending ECDSA key in /Users/XXX/.ssh/known_hosts:37
ECDSA host key for raspberrypi.local has changed and you have requested strict checking.
Host key verification failed.
Find the line like Offending ECDSA key in /Users/XXX/.ssh/known_hosts:37. It means you should edit ~/.ssh/known_hosts and remove line 37 to fix the nasty.
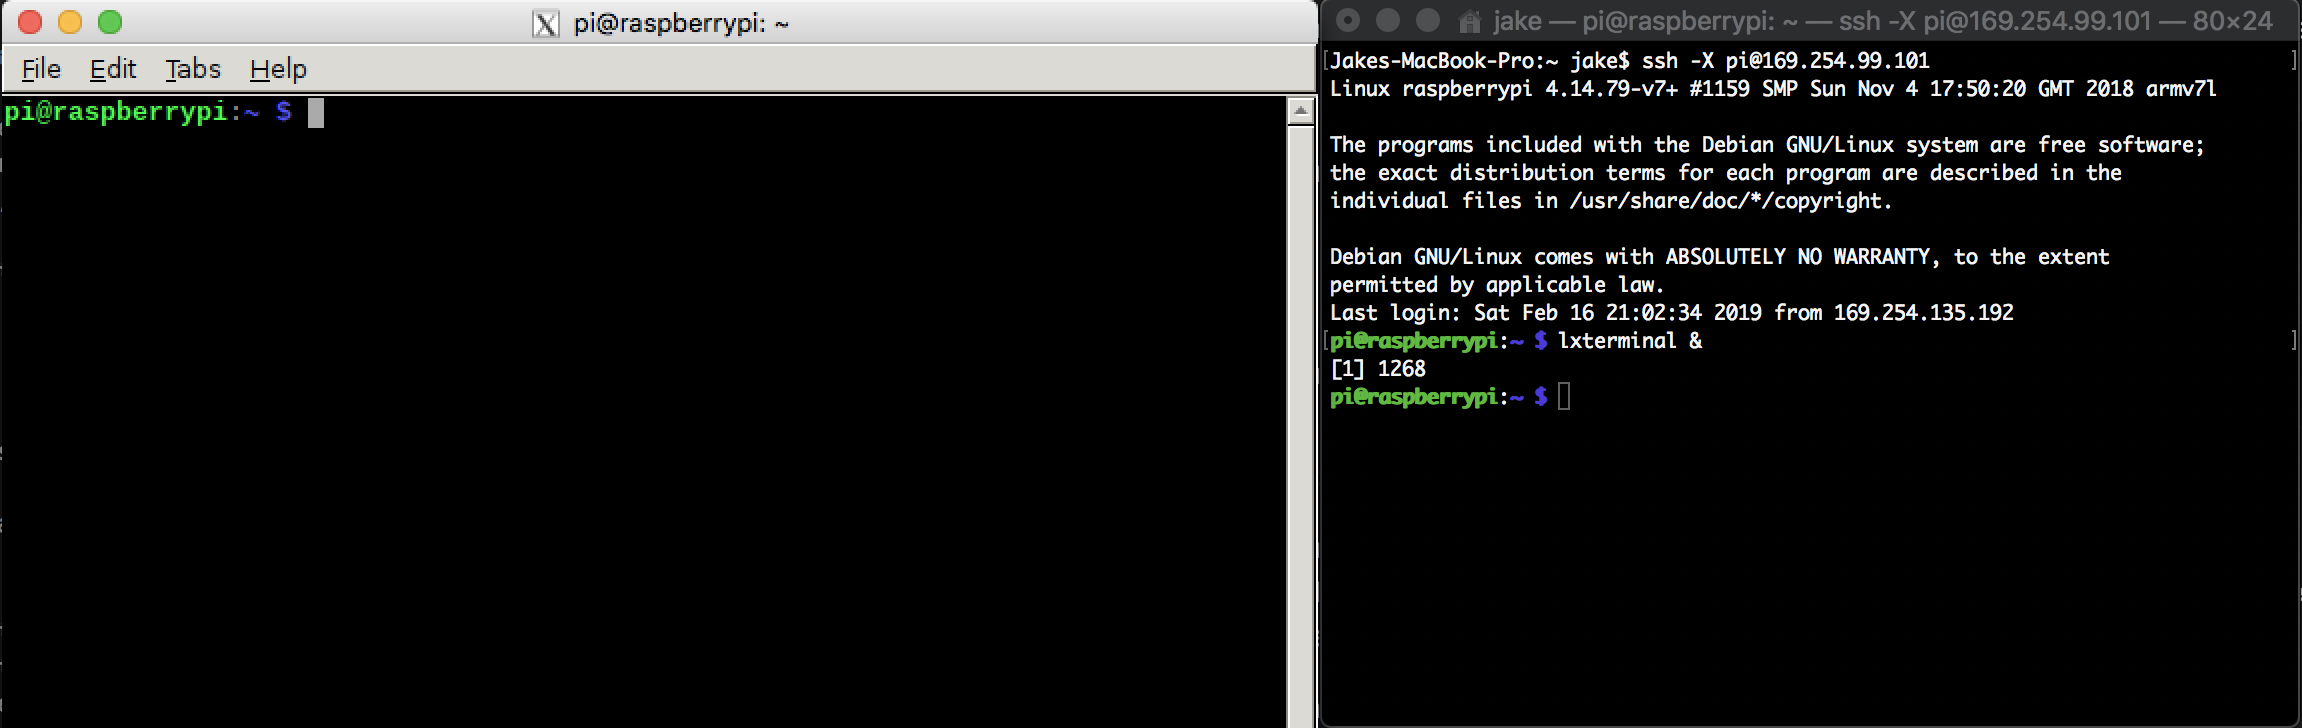
Speaking of investments, given the premium placed on screen real-estate don’t overlook the -X option to ssh (on Mac/macOS you also need XQuartz):
VNC will give you access to the full desktop.
If you use a VNC client other than RealVNC you may not be able to connect. TigerVNC complains: No matching security types. Either use RealVNC or follow the VNC configuration instructions.
Another option worth looking at is xrdp. It makes sense when:
- Network connectivity/bandwidth are not an issue (ethernet works best- same goes for VNC)
- You’re already using RDP to connect to Windows machines
- There’s a small screen connected to the Pi
# On the pi
sudo apt-get install -y xrdp
You should then be able to use an RDP client (e.g Microsoft Remote Desktop 10) to connect to raspberrypi.local or the IP address of the Pi.
Display
If you’ve got some kind of small display (like the 7” touchscreen) you may need additional configuration.
- Rotate screen 180 degrees. In
/boot/config.txtadd:lcd_rotate=2 - Adjust screen brightness (max brightness is
255, higher than that results in “I/O Error”):sudo sh -c "echo 80 > /sys/class/backlight/rpi_backlight/brightness" - Virtual Keyboard. Regardless if you call it a “soft keyboard”, “on-screen keyboard”, or something else, you might want one. Regardless if you prefer iOS or Android, prepare to be disappointed:
sudo apt-get install matchbox-keyboard - Screen saver:
sudo apt-get install xscreensaver
Software
For case-insensitive shell auto-completion, in ~/.inputrc:
set completion-ignore-case on
Pretty much the first thing you’re going to want to do is:
# Update the firmware (may not be necessary with recent devices)
sudo rpi-update
# Change `pi` user's default password
passwd

sudo apt-get update
sudo apt-get install -y vim screen # Other stuff...
If you haven’t already, take the time to learn vim or emacs. Nano/pico are the Linux moral equivalent of Windows Notepad. It takes a month to feel productive, but totally worth it. If you go with emacs and have a gimpy ctrl key (like Mac laptops), you might want to swap “caps lock” and ctrl:
- MacOS: System Preferences > Keyboard > Keyboard > Modifier Keys…
- Win10: in PowerShell (from this SO- you are using PowerShell, right?):
$hexified = "00,00,00,00,00,00,00,00,02,00,00,00,1d,00,3a,00,00,00,00,00".Split(',') | % { "0x$_"}
$kbLayout = 'HKLM:\System\CurrentControlSet\Control\Keyboard Layout'
New-ItemProperty -Path $kbLayout -Name "Scancode Map" -PropertyType Binary -Value ([byte[]]$hexified)
screen
Because everything takes longer on low-end devices, screen is handy if you plan to leave the Pi plugged in somewhere and use a laptop. It allows you to have a session persist after you clam up:
screen # Start a session
screen -S <name> # Start session with <name>
# Ctrl-a d # Detach from the session
# Ctrl-a ? # Show key bindings
# Ctrl-a k # Kill the session
screen -x # Attach to running session
screen -r <name> # Attach to session with <name>
screen -dRR # Attach to session creating/detaching as needed (if multiple use first)
screen -ls # List sessions
screen -e xy # Change command character
# For example, since Ctrl-a interferes with bash's default emacs mode:
screen -e^gg
# Now `Ctrl-g d` detaches and `Ctrl-g g` is a literal `Ctrl-g`
More
- There’s no official VS Code releases, but there’s community provided binaries
- PowerShell Core
- Install Rust via rustup:
curl https://sh.rustup.rs -sSf | sh - .Net Core for ARM (2.2.2 and/or 3.0.0)