I got a 3D printer around 2 years ago and other than the occasional dodad, it hasn’t been used for the intended purpose of printing custom cases for projects (like my solar-powered USB hardware). I finally got around to investigating this because I need a case for my CAPA13R mini-PC.
There’s already tons of resources on the web to help you pick a 3D printer, explain the different printing filament materials, tutorials on modeling and slicing, and so on. I’m just going to cover some tips to start making things with fairly precise constraints (but no moving parts).
Creating 3D Models
Despite being in the game industry 15 years and working along-side people who use DCC tools like 3ds Max, Maya, and ZBrush everyday, I possess no 3D-modeling skills (other than briefly using MilkShape 3D in uni). That gap needs to be closed first.
I decided on the following 3D modeling software requirements:
- Precise dimensions to achieve a good fit
- Free (preferably FOSS)
- Offline (not web/cloud-based)
- Multi-platform (at least Mac and Windows)
The parametric modeler FreeCAD meets all these requirements so I’ve been using that, but there’s other options that might work just as well. FreeCAD is a non-trivial program so I sought out some tutorials. There’s an abundance of material online, “DrVax” has a few videos on FreeCAD specific to 3D printing.
Blender might also be an option and better suited to general 3D modeling, but I didn’t investigate how easy it is to use for CAD design. OpenSCAD looks particularly interesting.
The basic process to 3D print any object is:
- Measure the various dimensions for the 3D object
- Create 3D model and export as STL (or another format supported by slicer)
- Use slicer software to generate g-code for 3D printer
I’m using the slicer developed for my printer, but you can search for what’s recommended for your printer or to get more advanced features.
Modeling/FreeCAD
- Export a simple object from the modeler and import into your slicer to figure out the position/orientation of the print bed relative to your modeling (probably XY-plane and +Z axis). You can always move things around, but this makes it easier to think about.
- Start with a simple object and work on increasingly complex objects to get a handle on the modeling software, slicer, and 3D printer.
- Use a meaningful reference point (e.g. the corner of a real-world physical object) as the origin from which to measure and model. This keeps dimensions/orientation simple and avoids additive in-accuracy/imprecision.
- In FreeCAD,
Ctrl+Shiftrotates andCtrl+Cmdpans the view with the left button (i.e. when using a trackpad). - Model in a natural, forward order as if working with clay; model and validate major/important features first and leave details and flourishes (i.e. fillet and chamfer) until the end. This minimizes re-work when adjustments need to be made.
- FreeCAD’s model view is like snapshots back in time with pointers into the past as you make changes. Don’t alter the space-time continuum lest you create dangling pointers! At least until you learn to work with it.
- Keep it data-driven (FreeCAD’s spreadsheet workbench and cell aliases);
=board_width + Xis more meaningful than15.2and makes it easier to tweak related dimensions. - To align geometry where there’s no useful reference, create a line to snap things to and toggle construction mode:

- Rename components (i.e. sketches/pads/pockets) so as the model becomes more complex you can find things.
-
Superfluous air-vents or similar details help reduce the amount of material, print time, and overall weight:

- Consider dimensions where tolerances are permitted, note where wires/connectors go, account for how an object would be inserted into the print and leave extra room. Similarly, pad accordingly (e.g. away from measured dimensions).
- Model the bare-minimum (reduced pad dimension in FreeCAD) and print a prototype to test fitting.
- If you’re going to print multiple pieces separately, create them as multiple bodies in FreeCAD and let the sketcher make clones or use shape binder to create relationships:
- Exaggerate features that you think only need to be a few millimeters. They’re more likely to print correctly, and will be less fragile.
Slicing and Printing
- Start with PLA filament as it’s generally the most forgiving and easiest to work with (and often cheapest).
- Prototype with a “junk” color you’re unlikely to use for finished products to conserve more useful filaments.
- Use slicer low-quality settings to speed up prototyping.
-
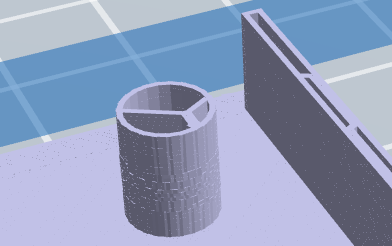
Make sure to check what the slicer is generating- hollow walls use far less material:
- Since models print from the bottom upwards, you may need supports for overhangs. Most slicers can add these, if that’s not workable you can build them into the model.
- Consider whether supports will be easy to remove without damaging the model. Print a small section if you’re not sure.
- I tend to set-and-forget models I’ve downloaded, but you’ll want to keep a closer eye on “unproven” models to ensure the printer doesn’t waste a lot of filament making a mess.
-
If warping occurs, try increasing the platform temperature and/or have the slicer generate a “raft” or “brim” (also see here and here).
- Print near an open window or in a well-ventilated area. Even if non-toxic, the smell of molten plastic leaves a lot to be desired.
- Use a thin, flat object with a sharp edge (like a paint scraper or knife) to help remove objects from the print bed after everything cools. There’s numerous other tricks.
- If you need to print multiple objects with the same material, use the slicer to layout the various models (or duplicates) and do as many as possible in one printing.
- If you’re going to print a number of different objects, plan ahead to batch the same material together to minimize the number of times you have to switch filaments (taking into account if your printer has multiple extruders/spools).
Optional (But Often Useful)
- Dremel/sand-paper/file(s), thin wire-cutters/X-acto knife, needle-nose pliers, etc.: to help remove supports and weird edges, or make minor alterations to potentially salvage an object with trivial flaws. This might not have the best results, YMMV.
-
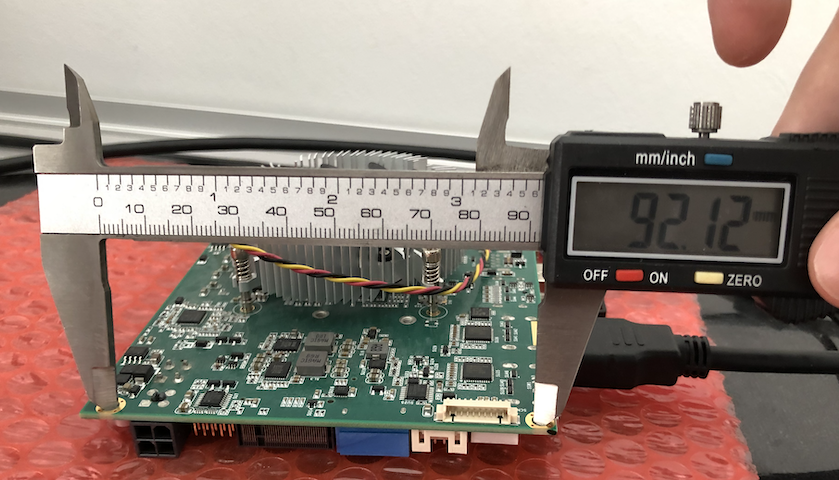
Calipers (digital or analog): makes it easy to take precise measurements for a snug fit or that would be awkward with a ruler:
Small round objects Precise distances with obstructions 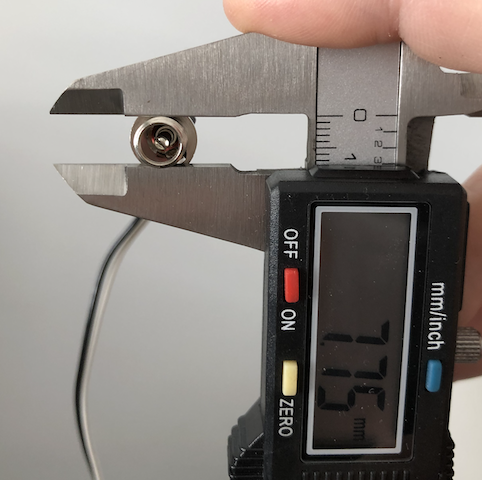
- Check thingiverse for “universal” spool holders or other accessories that might help you wrangle filament.
- Trashcan: Seriously. Little whisps of plastic, supports, rafts, prototypes, botched prints, etc. quickly litter your work area.
- Small hand-held vacuum cleaner and/or something like an anti-static mat to make cleanup a breeze.
- Mouse: most modeling software and slicers make good use of a third button.
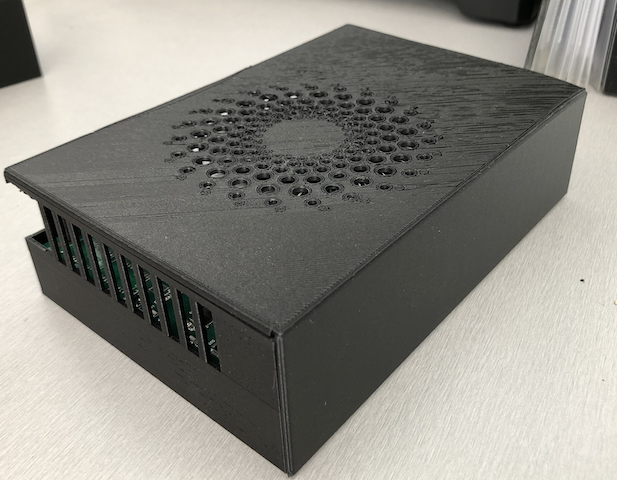
Final Product
I’m pretty happy with the end results. The CAPA13R board and power supply rest securely in the case, and it looks decent enough to sit in my living room.
| Front | Back |
|---|---|
 |
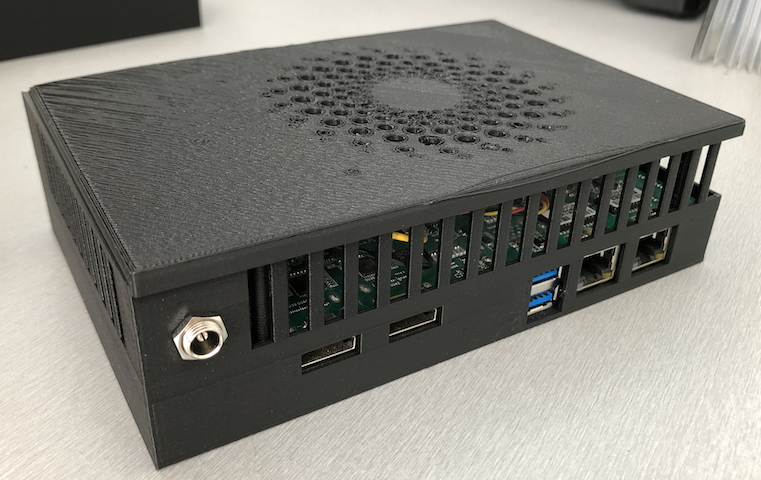 |
Contemplating a second printing to correct a few minor gripes. I printed the top with a brim instead of a raft and the right side warped a tiny bit and is a little ill-fitting, so the top doesn’t snap on quite as well as I envisioned. Also, I printed the top upside down to avoid using supports, but the surface towards the platform/raft doesn’t look as nice.