Between my love of game consoles and working on Z+ with AMD I perhaps have an unhealthy obsession with AMD APUs. When AxiomTek announced (1, 2) a single-board-computer with Zen CPU cores and Vega graphics I was… intrigued, and thought it might make for a nice Steam Box.
Hardware
Details on the CAPA13R board are available from the product page and more detailed spec sheet. Common features:
- AMD Ryzen Embedded V1605B or V1807B APU
- DDR4 SO-DIMM (up to 16GB of memory)
- 1 x M.2 Key B (for SSD), 1 x M.2 Key E
- 2 x 10/100/1000 Mbps Ethernet
- 2 x USB 3.2 Gen2
- 2 x HDMI, 1 x DisplayPort++, 1 x LVDS
Notably, it lacks wifi and bluetooth. The wifi I can do without (the board requires external power so an ethernet cable is fine), but I added a USB bluetooth adapter I had laying around.
| V1605B | V1807B | |
|---|---|---|
| Memory | DDR4-2400 | DDR4-3200 |
| Power min. RMS (W) | 12V @ 2.5A | 12V @ 4.2A |
Details on the AMD SoC are available from the Ryzen Embedded V1000 series product page and the product brief. All models have 4 cores (8 threads, 4M L2 cache) Zen micro-architecture CPU married with a Radeon Vega 8 GPU (GCN5):
| V1605B | V1807B | |
|---|---|---|
| CPU base/max GHz | 2.0 / 3.6 | 3.35 / 3.8 |
| GPU CU/GHz/TFLOPS | 8 / 1.1 / 1.1 | 11 / 1.3 / 1.8 |
| TDP range/nominal (W) | 12-25 / 15 | 35-54 / 45 |
| DDR4 (MT/s / GB/s) | 2400 / 19.2 | 3200 / 25.6 |
Like NVidia’s Jetson Nano, the memory bandwidth is rather low. For comparison, the original Xbox One/Xbox One S has 8 Jaguar cores (pre-Zen, 8 threads), 12 CUs (GCN2, 1.3/1.4 TFLOPS), and DDR3 at 68.3 GB/s. It’s difficult to make an “apples to apples” comparison because Zen has 52% improved IPC, GCN 2 and 5 are fairly distant, and the Xbox has an additional 32 MB of ESRAM at 200+ GB/s (generally used for render targets). But, the V1605V and V1807B are “in the ballpark” of the original Xbox and Xbox S, respectively- memory bandwidth aside.
I picked up a lower-end CAPA13R with the V1605B and added:
- Transcend 240GB SATA III 6Gb / s MTS420S 42mm M.2 SSD
- HyperX Impact DDR4 16GB, 2666MHz CL15 SODIMM XMP - HX426S15IB2 / 16
- PicoPSU-60 12V DC-DC ATX Mini-ITX 0-60W power supply power
- Salcar 60 W Transformer Power Adapter (12 V 6 A, 5.5x2.5mm)
| Top | Bottom |
|---|---|
 |
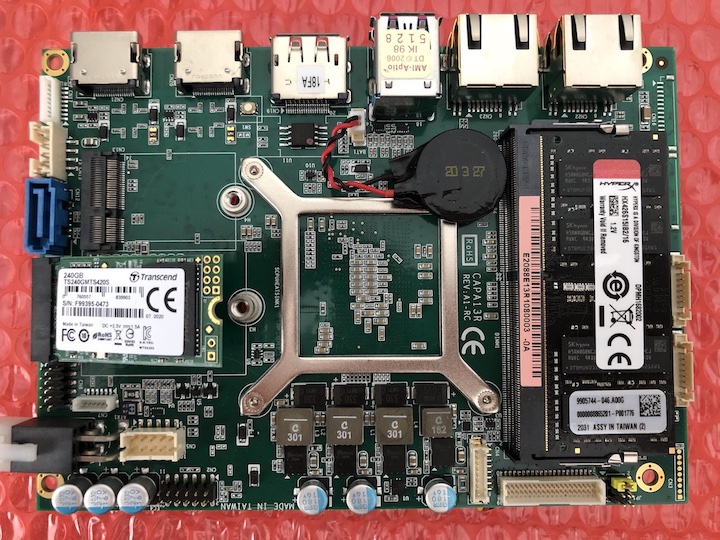 |
Until ATX12VO (also see this guide) becomes more of a thing, I’m using a 60W PicoPSU with pins 13 and 14 (OR pin 14- PS-ON- to one of the other GNDs) shorted to power the system. Depending on your power supply of choice, another approach may be necessary.
It’s worth mentioning SSW1, the small switch to the far left of the external ports. With 1-2 closed (switch away from the external ports) auto power on is disabled and the soft power button is needed to power on the system. With 2-3 closed (switch towards external ports) power on is enabled and just plugging the system in will auto power on.
Benchmarks
Installed Windows 10 20H2/19042.631 and the drivers to get audio and graphics working. Otherwise stuck with the stock install and ran a few benchmarks:
| Benchmark | Settings | Score Min/Avg/Max FPS |
|---|---|---|
| Unigine: Heaven 4.0 | 4K/OpenGL | 45 1.1 1.8 4.0 |
| Unigine: Heaven 4.0 | 1920x1200/OpenGL | 252 4.5 10.0 24.1 |
| Unigine: Heaven 4.0 | 1080p/OpenGL | 317 5.1 12.6 35.1 |
| Unigine: Superposition v1.1 | 1080p med/OpenGL | 857 5.72 6.41 7.89 |
| Unigine: Valley 1.0 | 1920x1200/DX11 | 596 9.7 14.2 24.1 |
| Benchmark | Settings | Score Graphics CPU |
|---|---|---|
| 3DMark Demo Time Spy v1.2 | 4K/64-bit | 595 529 2085 |
| 3DMark Demo Time Spy v1.2 | 1920x1200/64-bit | 641 571 2170 |
So, not cut out for 4K gaming. However, during none of the benchmarks did the heatsink even become warm, and even the 1080p performance isn’t very good. I wondered if either the PicoPSU or power adapter just wasn’t delivering enough power, but the GPU seemed to be fully engaged:
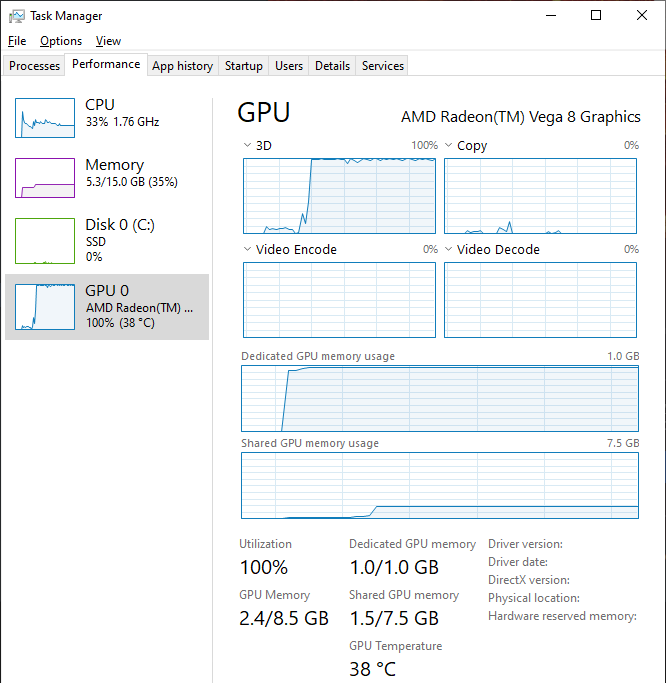
What stands out is the GPU has only 1 GB of dedicated memory. This was a limiting factor for us with the Z+ console (which had a carve-out of 2 GB for dedicated graphics memory leaving 6 GB of system memory). In our case, we had a BIOS option to specify the amount reserved for VRAM, but the CAPA13R BIOS currently has no such option.
In hind-sight I probably should have gone with the V1807V since the GPU is ~60% more powerful.
Update 2021/4/22:
Received a new BIOS from Axiomtek with a 3GB carve-out for dedicated GPU memory (see Updating BIOS). I re-ran some of the benchmarks and there was no meaningful change…
This coincides with the general consensus that increasing the amount of dedicated memory doesn’t improve performance because the GPU accesses memory through the same unified bus as the CPU (UMA) and shared memory allocated by the driver/OS has the same performance.
But why did Z+ show a performance difference? I believe there’s a few key differences:
- Z+ had significantly less memory; 8 GB vs 16 GB here.
- Z+ had 256 GB/s GDDR5 memory and a non-SSD drive, so the difference between memory and disc bandwidth was huge.
- “Rise of the Tomb Raider” and “Shadow of Mordor” in-game benchmarks use a lot more system/graphics memory than any of these benchmarks; in the screenshot above 35% of 16 GB total memory with 1.0/1.5 GB of dedicated/shared memory.
When the benchmark exceeds the amount of available memory things start getting paged out to disk. Perhaps the OS/driver version Z+ had made poor choices and increasing the amount of dedicated memory kept GPU allocations in memory. Similarly, when we increased the carve-out to 3 GB, that only left around 4 GB which put too much pressure on system memory and we also saw a perf drop. When there’s plenty of memory, this doesn’t happen, or the current OS/driver just does a better job.
Software
The default boot prompt timeout is 1s, so you’ll have to be quick to change BIOS settings. Press esc, set Advanced > Smart Fan Function to Enabled. This allows the fan speed to adjust based on the SoC temperature and makes the system much quieter.
Optionally, set Boot > Quiet Boot to Enabled to suppress the BIOS startup screen. However this replaces the Windows 10 logo with the American Megatrends logo- which doesn’t look great. Changing the UEFI logo seems to require a tool like “HackBGRT”, but I decided to not bother because the boot prompt timeout is short enough that my TV often isn’t even on when the BIOS startup is displayed.
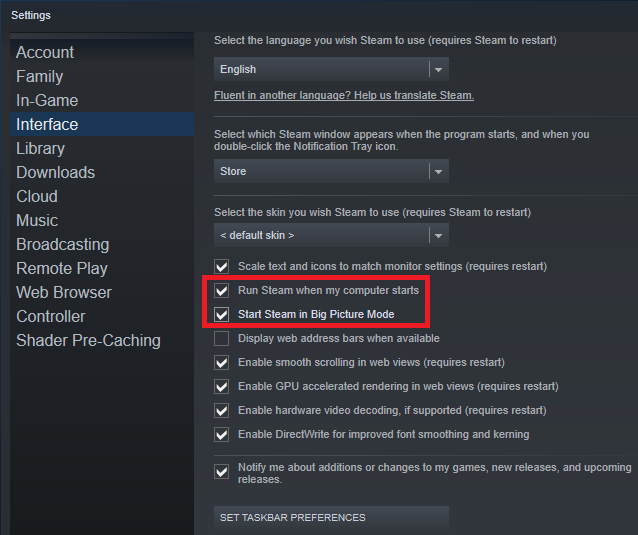
Have Steam auto-start in Big Picture Mode, via Steam > Settings:
Configure users to auto-login:
- Change registry:
- Enter
Win+Rand typeregeditOR hitWinkey and start typingregistry editor, then hitenter - Browse to HKEY_LOCAL_MACHINE\SOFTWARE\Microsoft\Windows NT\CurrentVersion\PasswordLess\Device change DevicePasswordLessBuildVersion to
0
- Enter
- Enter
Win+Rand typenetplwiz, then hitenterOR click OK - Uncheck Users must enter a user name and password to use this computer and click OK
Now when you restart the system it should login and launch straight into Steam BPM:

With an added USB bluetooth adapter, pair with a Dualshock 4 controller (or your preferred gamepad):
- In Windows Settings > Bluetooth & other devices
- Add Bluetooth or other device > Bluetooth
- On DS4 press SHARE and PS/home button at the same time and hold until controller LED starts flashing
- Should appear as “Wireless Controller”, click it to pair
To only see games with full gamepad support:
- Steam Library
- Move to the far right to find Filter Games and check Controller Supported
Optional but useful, there’s a number of wireless keyboards with integrated touchpad on the market:
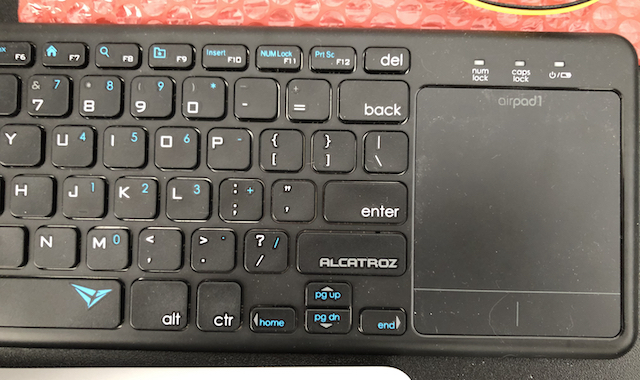
To invert the two-finger scroll gesture, try using registry editor to change ScrollDirection in HKEY_CURRENT_USER\Software\Microsoft\Windows\CurrentVersion\PrecisionTouchPad. If that doesn’t work, try setting FlipFlopWheel as per this answer.
To enable/disable edge gestures, use EnableEdgy in PrecisionTouchPad registry, or follow this forum post.
Updating BIOS
To update the BIOS you need to boot into an EFI shell. Some of the standard ways to do this:
- Enter BIOS setup and Save & Exit > UEFI: Built-in EFI Shell
- Windows 10 reboot into EFI shell
- Click virtual power button, hold
shiftand Restart. Or, Settings > Update & Security > Recovery > Restart now. - Troubleshoot > Advanced options > UEFI Firmware Settings
- Click virtual power button, hold
- Bootable USB device
- FAT32 format USB device
- Copy EDK2 X64 shell.efi to
d:\efi\boot\BOOTX64.efi(replaced:with USB drive) - Enter BIOS setup, Boot > Boot Option #1 > UEFI: Your USB device, Partition 1, then save changes and exit.
Should reboot into an EFI shell, and you can flash the BIOS:
# Change to USB device
Shell> fs0:
# Run flash script
FS0:> flash.nsh
You can use various commands like cd, ls/dir, and exit to change directories, list contents, and exit the EFI shell, respectively. If you open flash.nsh you can see it does something similar to:
AfuEfix64.efi CAPA13RXB.001 /p /b /n /reboot
Next Steps
Need to find some kind of case. Haven’t decided if I’ll try to buy or 3D print one.
Haven’t been able to get it waking from USB. I’ve tried disabling “Allow the computer to turn off this device to save power” and enabling “Allow this device to wake the computer” for everything related to USB and HID devices in Device Manager, as well as disabling “USB selective suspend” in advanced Power Settings. In the BIOS the only options for Advanced > ACPI Settings > ACPI Sleep State are “Suspend Disabled” and “S3”, but there doesn’t seem to be anything related to USB wake.
Maybe I’ll look into running some other software like RetroArch, or Kodi (formerly XBMC) later.
Most importantly, play some games!