For me, one of the best ways to get a “big picture” understanding of a game engine is to take simple content and go through the process of running it on your target platform. Here we’ll take “SamplesProject” that comes with the SDK and make a PC release build (like in the Lumberyard User Guide).
Asset Processing
First, we need to introduce the Asset Processor- which is responsible for importing game data (meshes, textures, animations, and so on) for use at runtime.
Legacy CryEngine
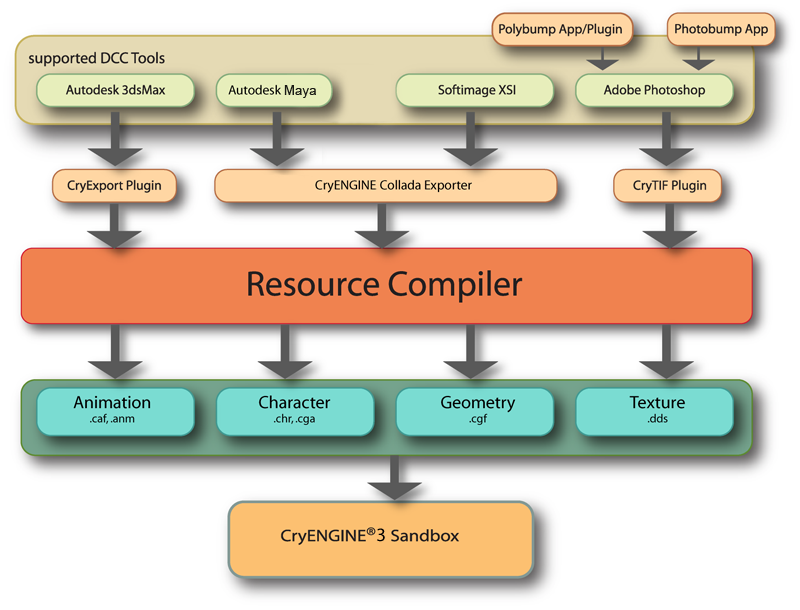
Historically, CryEngine required plugins for digital content creation (DCC) tools like 3DS Max, Maya, Photoshop, and a few others. These plugins then invoked the “Resource Compiler” to save assets in various proprietary file formats. From CryEngine 3 Art Pipeline doc:

This was always a bit painful:
- Required an additional setup step at each artist’s computer and the art workflow involved manual export with engine-specific tool
- DCC tools needed to be installed anywhere the raw assets would be worked with; intermediary custom file formats weren’t widely supported by other tools
- Plugins had to be maintained for each supported version of multiple DCC tools; necessitating lots of additional 3rd-party SDKs
- Only supported DCC tools could be used for asset creation
Lumberyard Asset Processor
Lumberyard takes the approach used by Unity3D (and other engines); instead of assets being “pushed” from DCC they are “pulled” by the engine, and the de facto standard FBX is used instead of tool-specific formats.
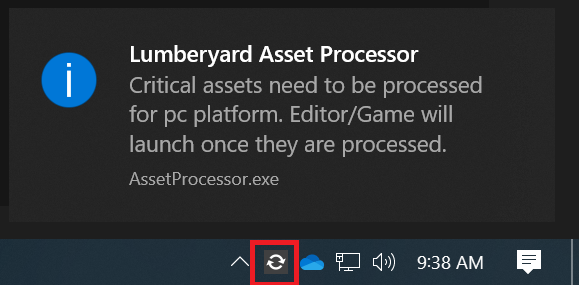
AssetProcessor.exe is a stand-alone application that lives in your system tray. When launched, it process all files that have changed since it last ran, and continually runs in the background converting new/altered files. When you launch Editor or a PC game client it will start automatically:

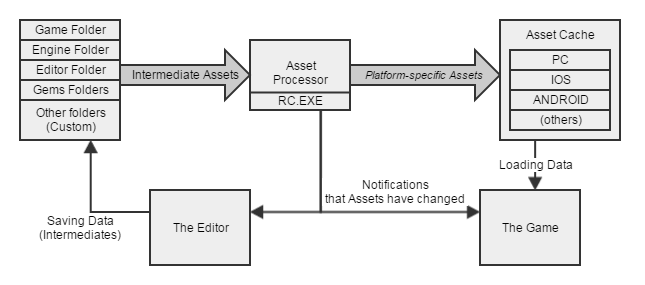
Diagram from Lumberyard Asset Pipeline doc:

The Resource Compiler (RC.exe) is still there, however it is being phased out by the AZCore Asset System and Asset Builder.
To build Asset Processor:
./lmbr_waf.bat build_win_x64_vs2017_profile -p asset_processor
This produces AssetProcessor.exe as well as AssetProcessorBatch.exe which simply processes all assets and is intended for use in build scripts.
Remote Shader Compiler
The second tool we need to introduce is the Remote Shader Compiler (RSC). When a game client or tool needs a shader it can’t find, the RSC generates it and returns it. This serves a few purposes:
- Track all shader permutations needed at runtime
- Produce pre-processed/pre-compiled shaders to speed loading/rendering
- Process shaders for platforms that can’t compile shaders from source (e.g. game consoles and mobile devices)
To build RSC:
./lmbr_waf.bat build_win_x64_vs2017_profile -p all --targets=CrySCompileServer
Run .\Tools\CrySCompileServer\x64\profile\CrySCompileServer_vc141x64.exe to start RSC:
Config file not found
Loading shader cache from D:\XXX\dev\Tools\CrySCompileServer\x64\profile\Cache\Cache.dat

0 shaders loaded from cache
Creating cache backup...
Move D:\XXX\dev\Tools\CrySCompileServer\x64\profile\Cache\Cache.bak to D:\XXX\dev\Tools\CrySCompileServer\x64\profile\Cache\Cache.bak2
Copy D:\XXX\dev\Tools\CrySCompileServer\x64\profile\Cache\Cache.dat to D:\XXX\dev\Tools\CrySCompileServer\x64\profile\Cache\Cache.bak
Cache backup done.

 caching enabled
Ready
If you launch a game and it connects, the RSC should start outputting lines like:
Loading ShaderList file: D:\XXX\dev\Tools\CrySCompileServer\x64\profile\Cache\SamplesProject/PC-D3D11_FXC-D3D11/ShaderList_D3D11.txt
System:        2 | 11/09 14:48:10 | Compiled [  109ms|       0s] (PC - D3D11_FXC - D3D11 - ps_5_0) FPPS
System:        2 | 11/09 14:48:10 | Compiled [  109ms|       0s] (   PC ps_5_0) FPPS
System:        2 | 11/09 14:48:11 | Updating: SamplesProject/PC-D3D11_FXC-D3D11/ShaderList_D3D11.txt
The ShaderList_D3D11.txt file it’s generating contains descriptions of shader permutations requested by the runtime. We need this later to create a release build.
Eventually, RSC passes a shader to one of the compilers in dev/Tools/CrySCompileServer/Compiler/:
| Compiler | Processing |
|-|-|
| LLVM*/ | DirectX Shader Compiler which uses LLVM/Clang to turn into DXIL
| PCD3D11/ | fxc (DirectX Effect-Compiler Tool)
| PCGL/ | HLSLCrossCompiler converts to GLSL for OpenGL/Vulkan and GLSL ES for OpenGLES
Finally, RSC returns the processed shader to the game client or tool that requested it.
Further information in Lumberyard docs:
Release Builds
With those two utilities out of the way, we can look at creating a PC release build of “SamplesProject”. The steps in the User Guide boil down to:
- Build asset paks
./BuildSamplesProject_Paks_PC.bat - Build shader cache paks
# Copy ShaderList produced by RemoteShaderCompiler cp .\Tools\CrySCompileServer\x64\profile\Cache\SamplesProject\PC-D3D11_FXC-D3D11\ShaderList_D3D11.txt . # Generate ShaderCache paks # lmbr_pak_shaders.bat <game name> D3D11|GLES3|METAL pc|es3|ios|osx_gl <ShaderList_X.txt> ./lmbr_pak_shaders.bat SamplesProject D3D11 pc ./ShaderList_D3D11.txt # Copy ShaderCaches to build cp .\build\pc\samplesproject\*.pak .\samplesproject_pc_paks\samplesproject\ - Compile the game
 # Build release game binaries
 ./lmbr_waf.bat build_win_x64_vs2017_release -p game_and_engine
 # Copy to build (samplesproject_pc_paks/Bin64vc141.Release/)
 cp -Recurse .\Bin64vc141.Release .\samplesproject_pc_paks\
Let’s look at the first two steps in more detail.
Build Asset Paks
In the BuildSamplesProject_Paks_PC.bat source, there’s two significant steps.
- Call Asset Processor in batch mode to prepare all “SamplesProject” assets for PC:
.\%BINFOLDER%\AssetProcessorBatch.exe /gamefolder=SamplesProject /platforms=pc - Generate a bunch of
*.pakfiles (zip archives) indev/samplesproject_pc_paks/samplesproject/:.\%BINFOLDER%\rc\rc.exe /job=%BINFOLDER%\rc\RCJob_Generic_MakePaks.xml /p=pc /game=samplesproject
Resource Compiler (rc.exe) uses dev\Bin64vc141\rc\RCJob_Generic_MakePaks.xml to place required files in the appropriate archive.
Build Shader Cache Paks
lmbr_pak_shaders.bat requires arguments <game name> <shader type> <platform> <shader list>:
<game name>is name of the game (e.g.SamplesProject)<shader type>is shader type defined ingen_shaders.py::add_shader_types()(e.g.D3D11)<platform>is a target platform also defined inadd_shader_types()(e.g.pc)<shader list>isShaderList.txtfile (generated by RSC)
Both <shader type> and <platform> are case-sensitive.
More concretely:
lmbr_pak_shaders.bat <game name> D3D11|GLES3|METAL pc|es3|ios|osx_gl <ShaderList.txt>
In the lmbr_pak_shaders.bat source, the main thing it does is call two other scripts:
Tools/PakShaders/gen_shaders.py:ShaderCacheGen.exeis a stripped-down version of the engine that takesShaderList.txtand connects back to RSC to pre-process/pre-compile all required shaders to populate the “shader cache”.
Tools/PakShaders/pak_shaders.py:- Takes the generated shader cache and creates
shadercache.pakandshadercachestartup.pakby zipping them together.
- Takes the generated shader cache and creates
We’ll talk about shader caches when we talk about shaders in more detail.
Further information in Lumberyard docs: